How to Clean an Air Fryer Heating Element (Without Wrecking It)
Last updated: August 3, 2026
The basket gets washed after every meal. The heating element, sitting out of sight at the top of the unit, often gets ignored for months. That is the part that causes smoke, burnt smells, and food that tastes faintly of the last six things you cooked.
Cleaning it takes about ten minutes and needs nothing you do not already own.
Why this part matters
Fat splatters upward during cooking and lands on the coil. Each subsequent cook bakes that layer harder. SharkNinja, which makes Ninja air fryers, describes the mechanism directly: Splattered fat hits the coil during the cooking process; over time, this can build up, and as the element gets hot, the residue is burned, turning to smoke. This is a fire hazard.
Westinghouse’s guidance makes the same point about performance, noting that accumulated grease can reduce cooking efficiency, introduce unpleasant flavours, or even pose a fire risk.
So this is not a cosmetic job. If your appliance has started producing smoke, this is very likely the cause — we cover the full diagnosis in why is my air fryer smoking.
How often
Manufacturers give different intervals, and the honest answer is that it depends on what you cook rather than on a calendar.
| How you use it | Suggested interval | Source |
|---|---|---|
| Part of a weekly meal routine | A light clean every couple of weeks | Westinghouse |
| Occasional use | Monthly | Westinghouse |
| General deep clean of the element | Monthly | SharkNinja |
| After a particularly greasy cook | Inspect and clean straight away | Westinghouse |
| Visual check | Weekly, with a torch | SharkNinja |
SharkNinja’s suggestion of a weekly torch inspection is the practical one. Shine a light up at the element and you will know within five seconds whether it needs attention. The company frames the reasoning as catching problems early: Address small spots before they bake into hard carbon.
For context on how rare this habit is, Ireland’s Competition and Consumer Protection Commission surveyed air fryer owners and found that fewer than half of daily users clean their appliance daily, 7% of daily users clean it about once a month, and 3% of owners say they never clean it at all.
What you need
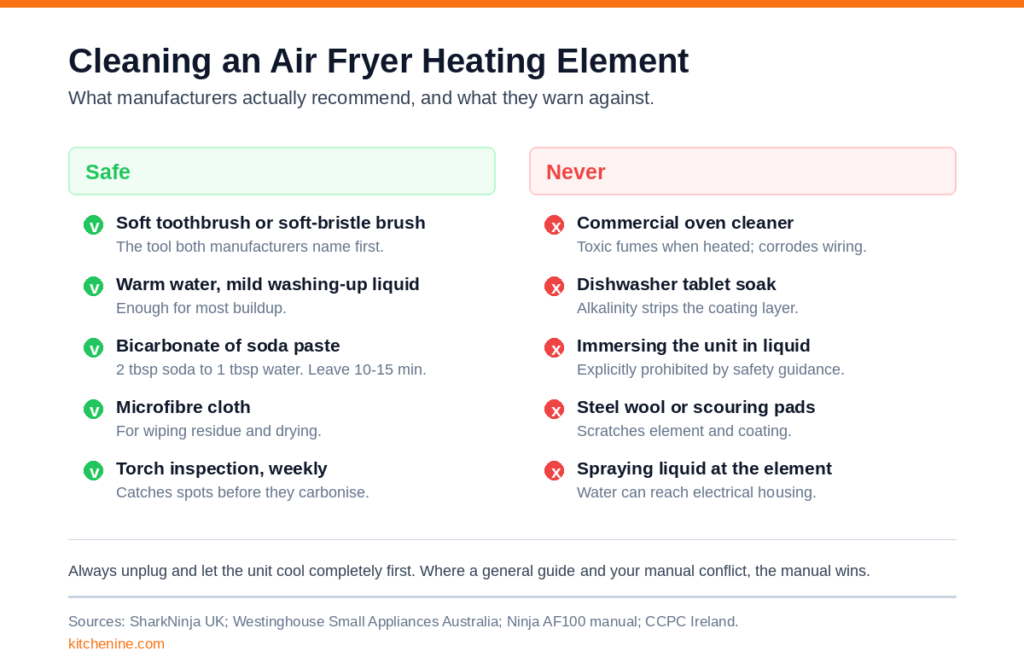
- Soft-bristle brush or a clean, soft toothbrush
- Microfibre cloth
- Warm water and mild washing-up liquid
- Bicarbonate of soda, for stubborn carbon only
That is the complete list. Both manufacturers we consulted specify ordinary household items and warn against anything harsher. Westinghouse: Avoid abrasive materials like steel wool or harsh chemicals, which can damage the non-stick coating or internal parts.
Ninja’s own manual for the AF100 series carries the same instruction as a safety point: DO NOT clean with abrasive cleaners, steel wool, or scouring pads.
The procedure
- Unplug it and let it cool completely. Not warm — cold. Every source we consulted opens with this step, and it is the one most commonly skipped.
- Remove the basket and crisper plate. This gives you a clear line of sight to the element. Wash them separately while you are there.
- Inspect with a torch. Look for discolouration, dark spots, and sticky film. What you see determines how much work follows.
- Tilt the unit for access. SharkNinja’s instruction for its own appliances is to
turn the completely cold, unplugged unit upside down
to reach the coil. Westinghouse describes only removing the basket and tray. Which applies depends on your model — see the disagreement section below. - Wipe the element gently. Dip a soft toothbrush in warm water with a little washing-up liquid, then — in SharkNinja’s words —
Tap off excess moisture so you avoid over-soaking the heating element.
Scrub gently to lift baked carbon. Westinghouse is equally clear:Don’t scrub hard—gentle pressure is key.
- For stubborn carbon, use a bicarbonate of soda paste. Two tablespoons of bicarbonate of soda to one tablespoon of warm water. Apply, leave it ten to fifteen minutes, then wipe away with a damp cloth. Do not let it dry hard on the coil.
- Clean the interior ceiling and walls. This step matters more than it sounds. Westinghouse explains why:
Residue on the walls and roof can fall onto the heating element during cooking.
Clean the element and ignore the ceiling and you will be back within a fortnight. - Wipe away all soap residue and dry thoroughly. Any detergent left behind will smoke on the next cook, which defeats the whole exercise.
- Let everything dry completely before reassembling. Ninja’s manual includes a specific cleaning step to
Clean the heating element with a cleaning brush to remove any food residues
, and a dry element is the end state you are aiming for.
Five things never to do
| Do not | Why |
|---|---|
| Spray commercial oven cleaner | SharkNinja: those chemicals release toxic fumes when heated and can corrode internal wiring. |
| Use the dishwasher tablet hack | SharkNinja reports its own engineering tests found the method accelerates non-stick degradation, because the intense alkaline environment strips the silicone polyester layer. |
| Immerse the unit in liquid | The CCPC’s safety guidance is explicit: Do not immerse your air fryer in water or any other liquid.Ninja adds: NEVER clean the main unit in the dishwasher. |
| Use steel wool or scouring pads | Scratches the coating and the element. Both manufacturers and Ninja’s manual prohibit it. |
| Spray or pour liquid at the element | Water reaching the electrical housing behind the coil is the one mistake with a genuinely serious outcome. |
The dishwasher tablet method deserves a note, because it circulates widely on social media and it does visibly work. SharkNinja’s objection is not that it fails to remove grease — it is that the alkalinity that removes the grease also degrades the coating underneath. This is a manufacturer describing tests on its own products, and we have not seen the underlying data, so read it as an interested party’s position rather than independent evidence. It is consistent with what the chemistry would predict.
Where the manufacturers disagree
SharkNinja tells owners to turn the unit upside down. Westinghouse’s procedure does not mention inverting the appliance at all, only removing the basket and tray.
This is not a contradiction so much as a difference between designs. Inverting a basket-style unit is common advice and gives far better access to the coil. But some models have components that should not be tipped, and Westinghouse lists Ignoring the Manual
among its common cleaning mistakes, noting that Different models may have specific care instructions.
Check your own manual before you turn anything over. Where a general guide and your manual conflict, the manual wins.
How to tell it worked
Run the appliance empty for a few minutes at a moderate temperature with a window open. Some odour on the first run after cleaning is normal as residual moisture evaporates.
What should not happen is continued smoke. SharkNinja treats visible smoke as diagnostic: Excessive smoke or steam rising from your machine when opened indicates a dirty heating element.
If smoke persists after a thorough clean, grease was not the problem, and the appliance needs the manufacturer rather than another scrub.
Prevention beats cleaning
- Wipe the interior after each use, once cool. Two minutes now saves the carbon layer later.
- Do not overcrowd the basket. Westinghouse notes that air needs to circulate
for proper cooking and to prevent excess splatter on the element.
- Be careful with liners. Baking paper reduces splatter, but Westinghouse cautions that liners
will reduce the air circulation with in the air fryer
and affect results. It is a trade-off, not a free win. - Dry components fully before storing them. Trapped moisture creates stale odours.
What this guide cannot tell you
- Whether your specific model can safely be inverted. Only your manual can answer that.
- Whether a discoloured element is dirty or damaged. Permanent discolouration on the metal is usually cosmetic; flaking material is not.
- How much buildup is too much. There is no published threshold, and we are not going to invent one.
- Whether cleaning will fix your smoke problem. It fixes most, not all.
- We were unable to load Instant Pot’s cleaning guidance for this article — the page returned a server timeout — so the manufacturer guidance here reflects SharkNinja, Westinghouse, and Ninja’s printed manual only.
Frequently asked questions
Can I use vinegar on the heating element?
No manufacturer guidance we found recommends it, and none of the sources for this article mention vinegar for the element. Warm soapy water and bicarbonate of soda are what the manufacturers actually specify. We are not going to recommend a method the manufacturers do not.
Can I remove the heating element to clean it?
On consumer air fryers, no. It is not a user-serviceable part, unlike an electric range coil. Clean it in place.
The element is permanently discoloured. Is it ruined?
Darkened metal on a heating element is normal after repeated heat cycles. It is not the same as carbon buildup, which is textured and comes away with cleaning.
What if grease has dripped inside the housing?
Stop and contact the manufacturer. Anything behind the visible coil is not a home cleaning job.
Does cleaning the element damage the non-stick coating?
The element itself usually is not coated — the basket is. The risk to your coating comes from what you use, not where you clean. See our guide to non-stick coating safety, and when to replace a basket if the coating is already damaged.
Related reading
- Why is my air fryer smoking?
- Why does my air fryer smell like plastic?
- Is air fryer non-stick coating safe?
- When should you replace an air fryer basket?
Sources: SharkNinja UK, How to Clean an Air Fryer; Westinghouse Small Appliances Australia, How do I clean my Air Fryer’s heating element?; Ninja AF100 series owner’s manual; CCPC Ireland air fryer safety guidance and research, 19 July 2026. Our method is described in how we research.